
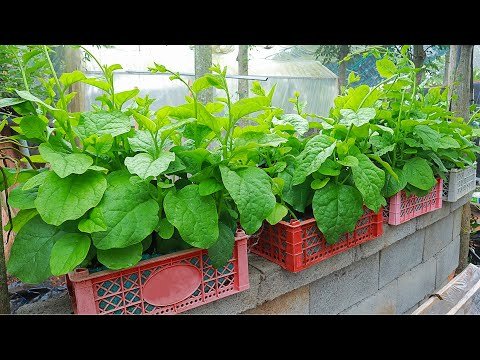
If you’re looking for a way to grow fresh, nutritious greens at home without taking up much space, Malabar spinach is an excellent choice. Also known as Basella alba, Malabar spinach is a fast-growing, heat-tolerant vine packed with vitamins and minerals. Even better, you can grow it easily using recycled plastic bottles, turning trash into a productive mini-garden. This method is perfect for urban gardeners, beginners, or anyone who wants organic vegetables at home while practicing sustainability.
In this detailed guide, we’ll explore how to grow Malabar spinach at home using plastic bottles, including preparation, planting, care, and harvesting. By the end, you’ll have a thriving, eco-friendly Malabar spinach garden—even on your balcony, terrace, or kitchen windowsill.
1. Why Grow Malabar Spinach at Home?
Malabar spinach is not only delicious but also extremely nutritious. It is commonly used in stir-fries, soups, salads, and curries.
Health benefits of Malabar spinach include:
- Rich in vitamins A, C, and iron, supporting immunity and energy levels.
- High in calcium and magnesium, promoting strong bones and heart health.
- Packed with antioxidants, which help fight free radicals.
- Contains fiber, aiding digestion and overall gut health.
Growing it at home guarantees fresh, chemical-free produce, saves money, and allows you to harvest whenever needed.
2. Why Use Recycled Plastic Bottles?

Plastic bottle gardening is a creative and eco-friendly solution for urban spaces. Using recycled bottles for Malabar spinach provides several benefits:
- Reduces plastic waste by repurposing old bottles.
- Space-saving: Ideal for balconies, terraces, or indoor gardening.
- Water-efficient: Bottles retain water well, reducing frequent watering.
- Portable: Easy to move bottles to get sunlight or protect plants from harsh weather.
- Beginner-friendly: Low-cost, easy-to-use containers make gardening simple.
This method is perfect for turning unused bottles into productive mini-planters.
3. Materials Needed for Bottle Gardening
Before starting your Malabar spinach garden, gather the following materials:
- Plastic bottles (1.5–2 liters, clean and washed)
- Potting soil (well-draining, nutrient-rich)
- Malabar spinach seeds or seedlings
- Scissors or craft knife
- String, wire, or hooks (optional for hanging bottles)
- Watering can or spray bottle
Optional: Organic fertilizer or compost to boost growth and yield.
With these simple materials, you can create an eco-friendly, productive garden at home.
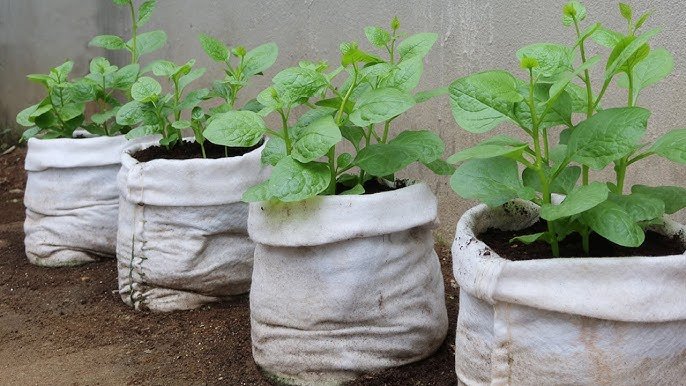
4. Preparing Plastic Bottles for Planting
Turning plastic bottles into planters is straightforward:
- Clean the Bottles:
Wash thoroughly to remove labels and residues. - Cut an Opening:
Make a rectangular or circular opening along the side of the bottle for planting and easy harvesting. - Add Drainage Holes:
Poke small holes at the bottom to allow excess water to drain, preventing root rot. - Optional Hanging Setup:
Use holes near the top and thread a string or wire to hang bottles vertically. This is perfect for space-saving vertical gardens. - Fill with Soil:
Add 3–4 inches of nutrient-rich soil, mixed with compost or perlite for aeration and drainage.
Your bottle is now ready to support healthy Malabar spinach growth.
5. Choosing Seeds or Seedlings
Selecting the right seeds or seedlings is important for a successful harvest:
- Use healthy, disease-free seeds from a reliable source.
- If using seedlings, select plants with 2–3 healthy leaves.
- Malabar spinach is a vigorous vine, so even small seedlings adapt quickly to bottles.
Healthy seeds and seedlings ensure fast germination and strong growth.
6. Sowing Malabar Spinach Seeds
Growing from seeds is simple and cost-effective:
- Fill the Bottle with Soil:
Lightly firm the soil for stability. - Plant Seeds:
Make small holes about ½ inch deep. Place 2–3 seeds per hole and cover lightly with soil. - Water Gently:
Keep the soil moist but not waterlogged. - Provide Sunlight:
Place bottles in a sunny location for at least 4–6 hours of direct sunlight daily.
Seeds typically germinate within 7–10 days, producing healthy seedlings ready for care.
7. Transplanting Seedlings in Bottles
If you start seedlings in trays or small pots, transplant them when they have 2–3 true leaves:
- Make a small hole in the bottle soil.
- Place the seedling into the hole and firm the soil gently.
- Water lightly to help the plant establish.
- Ensure sunlight exposure to promote strong growth.
Malabar spinach seedlings adapt quickly to bottle planters and start producing long, leafy vines.
8. Caring for Malabar Spinach in Bottles
Malabar spinach is relatively low-maintenance but benefits from some care:
- Watering: Keep the soil consistently moist. Bottles retain water well, reducing frequent watering.
- Sunlight: Provide at least 4–6 hours of sunlight daily. Partial shade works, but growth may slow.
- Fertilization: Use organic fertilizer every 2–3 weeks to encourage lush growth.
- Pruning: Regularly trim vines to prevent overcrowding and promote new growth.
Even if you occasionally forget watering, Malabar spinach is hardy and continues to grow.
9. Supporting Vine Growth
Malabar spinach is a climbing vine and benefits from support:
- Use trellises, sticks, or strings to guide the vines upward.
- Hanging bottles naturally allow vines to cascade down or climb along a wall.
- Prune long vines occasionally to encourage bushier growth and more leaves.
Providing support ensures your plant grows healthy, strong, and productive.
10. Preventing Pests and Diseases
Malabar spinach is hardy but occasionally faces issues:
- Aphids or small insects: Spray with neem oil or soapy water.
- Yellowing leaves: Usually caused by nutrient deficiency or overwatering. Adjust care accordingly.
- Fungal problems: Ensure good drainage and avoid waterlogged soil.
Regular observation and minimal intervention are enough to keep your plants healthy.
11. Harvesting Malabar Spinach
Harvesting Malabar spinach is easy and encourages continuous growth:
- Cut-and-come-again method: Snip outer leaves and vines regularly.
- Full harvest: Cut entire vines if needed, and new shoots will sprout from the base.
- Continuous harvest: Succession planting ensures a steady supply of fresh greens.
Leaves are tender and can be used in stir-fries, soups, salads, and curries.
12. Advantages of Growing Malabar Spinach in Bottles
Growing Malabar spinach in recycled plastic bottles offers numerous benefits:
- ✅ Space-efficient: Ideal for small apartments, terraces, or balconies.
- ✅ Eco-friendly: Reuses plastic and promotes sustainability.
- ✅ Low-maintenance: Hardy vines grow well with minimal care.
- ✅ Cost-effective: Reduces grocery bills.
- ✅ Fresh and nutritious: Pesticide-free, organic leaves at your fingertips.
This method is perfect for urban gardeners who want fresh, homegrown vegetables with minimal effort.
13. Cooking Ideas for Malabar Spinach
Malabar spinach is versatile in the kitchen:
- Stir-fried with garlic or chili: Quick and flavorful.
- Soups and curries: Adds texture and nutrition.
- Salads: Young leaves are tender and ideal for fresh salads.
- Smoothies: Blend leaves for a nutrient-packed green drink.
- Boiled or steamed: Retains nutrients and pairs well with sauces.
Homegrown leaves are fresher and more flavorful than store-bought options.

14. Why Bottle Gardening Works for Urban Spaces
Plastic bottle gardening is ideal for city dwellers because:
- Utilizes small terraces, balconies, or indoor areas effectively.
- Allows vertical gardening, saving floor space.
- Reduces water usage and prevents soil mess indoors.
- Supports low-maintenance gardening, even for beginners or busy individuals.
- Promotes sustainable and eco-friendly practices.
Even a few bottles can produce enough Malabar spinach for family meals, making it practical and rewarding.
Conclusion
Growing Malabar spinach at home using recycled plastic bottles is simple, sustainable, and highly rewarding. This method allows you to enjoy fresh, organic greens with minimal space, time, or effort. By preparing bottles, planting seeds or seedlings, providing light and water, and supporting vine growth, you can create a lush, productive garden in small urban spaces.
Start your bottle garden today and turn waste plastic into a source of nutritious, delicious vegetables. With minimal care, Malabar spinach will thrive, providing healthy, homegrown leaves all year round
Leave A Comment