
Growing your own vegetables doesn’t require a large backyard or expensive garden beds. With a little creativity and some recycled materials, you can grow healthy, delicious green beans right at home—even in small spaces! One of the most practical and eco-friendly ways to do this is by using plastic bottles.
In this article, we’ll explore how to grow green beans in plastic bottles and achieve a lush harvest in just 45 days. You’ll learn about the right setup, soil mix, watering routine, and helpful tips for maximizing yield. This method is perfect for balcony gardeners, urban dwellers, and anyone who wants to enjoy fresh homegrown beans year-round.
Why Grow Green Beans in Plastic Bottles?

Using plastic bottles to grow green beans is not only environmentally friendly but also surprisingly effective. Here’s why this method works so well:
- Eco-Friendly Recycling: It gives used plastic bottles a second life instead of sending them to landfills.
- Space-Saving Design: You can hang bottles vertically, place them on windowsills, or line them along a balcony railing.
- Excellent Drainage Control: You can easily customize the number of drainage holes to prevent waterlogging.
- Easy Mobility: Lightweight bottles can be moved around to catch the best sunlight.
- Low-Cost Gardening: All you need are a few bottles, seeds, and basic soil mix—no fancy tools required.
This technique makes gardening accessible to everyone, even if you live in an apartment or have limited outdoor space.
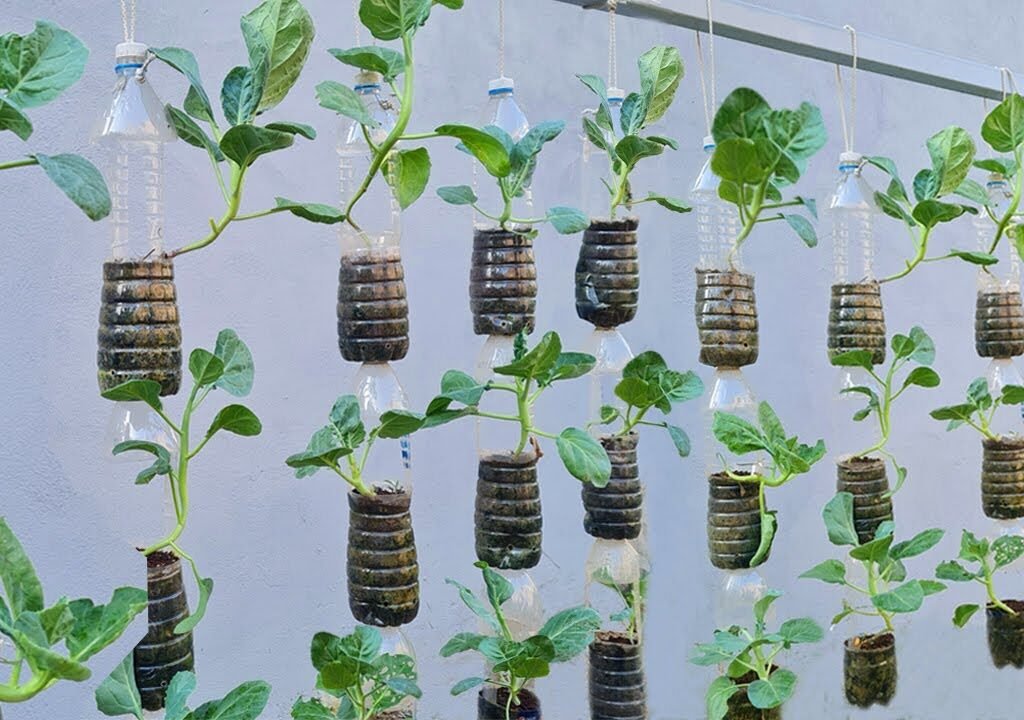
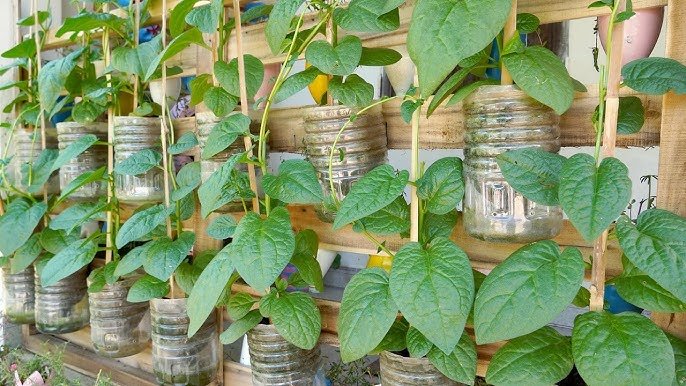
Step 1: Choose the Right Plastic Bottles
Start by selecting 2-liter or 5-liter plastic bottles—the type used for water or soft drinks. Make sure the bottles are clean and free from any residues.
- Cutting the Bottle:
Use scissors or a sharp knife to cut the top one-third off the bottle. This will create an open container for soil and allow plants to breathe. - Drainage Holes:
Use a heated needle or nail to make 4–6 small holes at the bottom. Good drainage is essential to prevent root rot. - Optional: You can use the top part of the bottle inverted as a mini greenhouse cover to maintain humidity during germination.
Step 2: Prepare the Perfect Soil Mix
Green beans prefer light, well-draining soil that’s rich in organic matter. A good mix for bottle gardening includes:
- 50% garden soil or compost
- 30% coco peat or peat moss
- 20% perlite or sand for aeration
Add a handful of organic compost or vermicompost to enrich the mix with essential nutrients. Avoid heavy clay soil—it can hold too much water and suffocate roots.
Pro Tip: Mix in some wood ash or bone meal to boost phosphorus and potassium, which promote flowering and pod development.
Step 3: Planting Green Bean Seeds
Once your bottles and soil are ready, it’s time to plant!
- Soak Seeds Overnight:
Soaking green bean seeds in water for 6–8 hours helps them sprout faster. - Planting Depth:
Place 2–3 seeds about 1 inch deep in each bottle. Cover lightly with soil and water gently. - Spacing:
If you’re using multiple bottles, leave a few inches of space between them to allow air circulation and prevent fungal growth.
Keep the bottles in a warm, sunny spot—green beans love full sunlight, ideally 6–8 hours per day.
Step 4: Watering and Care Routine
Watering is key in bottle gardening because small containers dry out quickly. However, too much water can also cause root problems.
- Watering Frequency:
Check soil moisture daily. Water only when the top inch of soil feels dry. - Method:
Pour water slowly to allow even absorption and prevent overflow. - Mulching:
Adding a thin layer of dried leaves or straw helps retain moisture and keeps the soil cool.
Avoid letting water sit at the bottom of the bottle. Proper drainage ensures healthy roots and rapid growth.
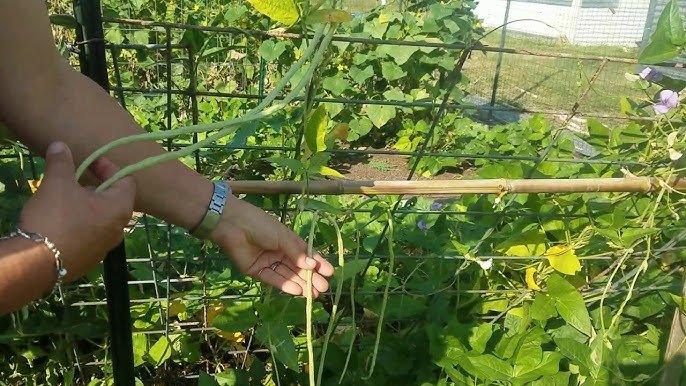
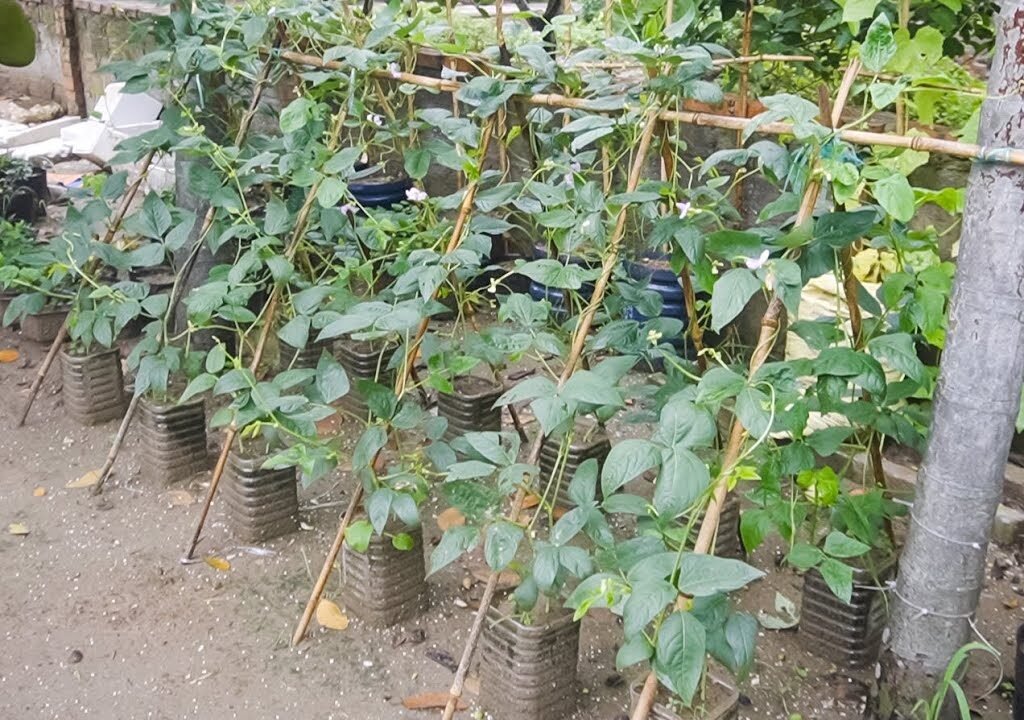
Step 5: Providing Support for Vines
Most green bean varieties are climbers, and they’ll need something to climb on as they grow.
- Insert thin bamboo sticks or wooden stakes into each bottle.
- You can also tie strings or twine from the bottle to a balcony railing, fence, or hook above.
- As the vines grow, gently guide them to climb upward by tying them loosely with soft string.
This vertical setup not only supports plant growth but also saves space and improves air circulation.
Step 6: Sunlight and Temperature
Green beans thrive in warm weather with daytime temperatures between 20°C and 30°C (68°F to 86°F).
- Place the bottles in a sunny location—a south-facing balcony, terrace, or windowsill is ideal.
- Rotate bottles occasionally to ensure even sunlight on all sides.
If the temperature drops too low, cover the plants at night using a plastic dome or light cloth to protect them from chill.
Step 7: Fertilizing for Fast Growth
Bottle-grown plants need regular feeding since nutrients are limited in small soil volumes.
- Every 10–15 days: Apply a diluted liquid organic fertilizer such as compost tea, fish emulsion, or seaweed extract.
- Avoid too much nitrogen: Excess nitrogen encourages leafy growth but reduces flower and pod formation.
- When plants start flowering, switch to a fertilizer higher in phosphorus and potassium to boost yields.
Step 8: Managing Pests Naturally
Container gardens are less prone to pests, but you may still encounter a few problems like aphids or whiteflies.
- Neem Oil Spray: Mix 1 teaspoon of neem oil with a few drops of liquid soap in 1 liter of water. Spray weekly to prevent infestations.
- Garlic or Chili Spray: Acts as a natural deterrent for most insects.
- Manual Removal: If you spot caterpillars or beetles, simply remove them by hand.
Healthy plants grown in clean bottles and nutrient-rich soil tend to resist pests better.
Step 9: Harvesting in Just 45 Days
With proper care, your green beans will be ready to harvest in about 40–45 days after planting!
Signs of readiness:
- Pods are firm, crisp, and about 4–6 inches long.
- Harvest when beans are still tender for the best flavor.
Use scissors to cut the pods instead of pulling them by hand, which may damage the plant. Regular harvesting encourages more flower and pod production.
Pro Tip: The more you pick, the more beans your plant will produce!
Step 10: Reusing and Extending the Harvest
After harvesting, don’t throw away the soil. Instead:

- Remove old roots and mix in fresh compost.
- Reuse the same bottle to start a new batch of seeds.
- Rotate crops occasionally—alternate between beans, lettuce, or herbs to keep the soil balanced.
You can grow several cycles of green beans each year, especially in warm or tropical climates.
Additional Tips for Success
- Choose Compact Varieties: Look for bush-type or dwarf green beans—they grow well in bottles and need less space.
- Avoid Overcrowding: Each bottle should host only one strong plant for maximum yield.
- Monitor Growth Daily: Early attention to water, pests, and sunlight helps prevent problems before they start.
- Label Bottles: If you’re experimenting with different bean types, label bottles to track which performs best.
Environmental Benefits of Bottle Gardening
Aside from producing fresh food, this method has positive environmental effects:
- Reduces plastic waste and encourages recycling.
- Decreases dependency on chemical fertilizers and packaging from store-bought vegetables.
- Saves water through controlled watering.
- Makes urban living greener and more sustainable.
It’s a small yet powerful way to contribute to the planet while enjoying the fruits (or rather, beans) of your labor.
Final Thoughts
Growing green beans in plastic bottles is an incredibly simple, cost-effective, and rewarding gardening project. In just 45 days, you can transform discarded bottles into thriving mini-gardens that provide crisp, nutritious beans for your table.
This technique proves that space and resources are never limitations when you have creativity and care for nature. Whether you’re a beginner or a seasoned gardener, bottle gardening offers endless possibilities—from beans to herbs, tomatoes, and even leafy greens.
So, grab a few plastic bottles, some green bean seeds, and start your eco-friendly gardening journey today. In just a month and a half, you’ll be amazed at the vibrant green vines and the fresh harvest right from your balcony or windowsill!
Leave A Comment