Hydroponics is a modern, soil-free method of growing plants that allows for fast growth, high yields, and resource-efficient gardening. Among the many vegetables suitable for hydroponic systems, cabbage stands out for its nutritional value, versatility, and high demand in home kitchens.
The idea of growing cabbage hydroponically might sound complicated, but as highlighted in the YouTube video “How to grow hydroponic cabbage in recycled plastic bottles at home”, it’s surprisingly easy, inexpensive, and eco-friendly. Using simple recycled materials, anyone can grow healthy, nutrient-rich cabbage right at home, even without a traditional garden.
This guide provides a step-by-step approach to hydroponic cabbage cultivation, tips for maximizing yield, and methods to make your garden sustainable and productive.
Why Grow Hydroponic Cabbage?
Hydroponic cabbage offers numerous benefits:
- Space-Saving: Perfect for balconies, terraces, or small indoor spaces.
- Faster Growth: Nutrients are delivered directly to roots, accelerating development.
- Pest-Free: Soil-borne diseases and pests are minimized.
- Sustainable: Uses recycled materials and reduces water consumption.
- Fresh and Healthy: Grow organic, chemical-free cabbage at home.
With hydroponics, even urban gardeners with limited space can enjoy homegrown cabbage year-round.
Step 1: Collecting Materials
The first step in hydroponic cabbage gardening is assembling affordable and readily available materials. You will need:

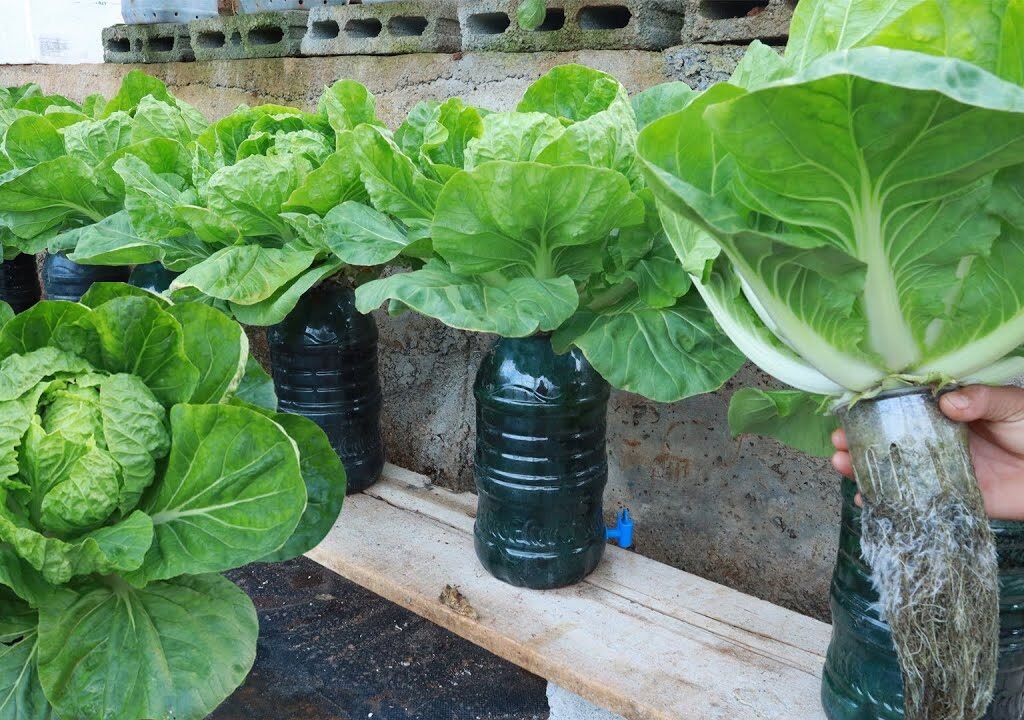
- Recycled plastic bottles (1–2 liter soda bottles work best)
- Hydroponic nutrient solution (store-bought or homemade)
- Growing medium: coconut coir, perlite, or vermiculite
- Cabbage seeds or seedlings
- Scissors, knife, or cutter for bottle modification
- String or hooks for vertical setup
Using recycled bottles makes this project eco-friendly and cost-effective.
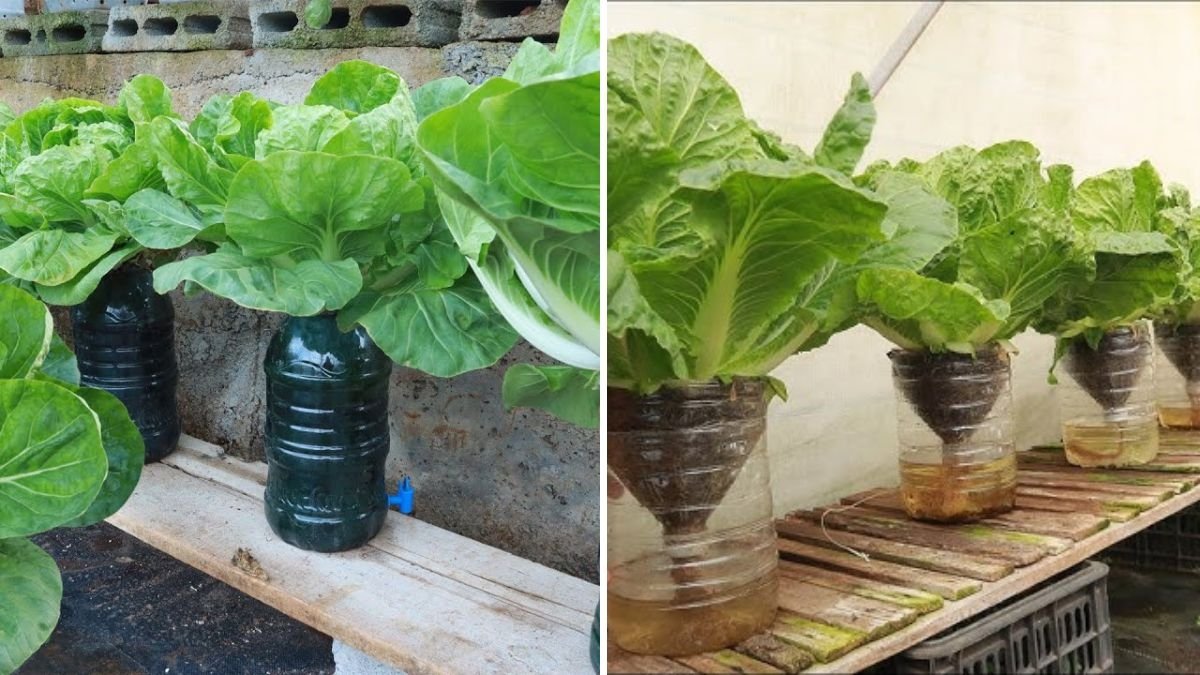
Step 2: Preparing Plastic Bottles
Proper preparation of the bottles ensures healthy root growth and a stable system:
- Cut the bottom off the bottle to hold the nutrient solution.
- Make small holes near the top to insert the plant securely.
- Optionally, poke a few small holes in the bottom for drainage or overflow.
- Clean bottles thoroughly to remove any residues.
Well-prepared bottles provide a safe environment for roots and cabbage growth.
Step 3: Preparing the Nutrient Solution
Hydroponic cabbage requires a balanced nutrient solution for optimal growth:
- Essential nutrients include nitrogen (N), phosphorus (P), potassium (K), calcium, magnesium, and trace elements.
- You can purchase ready-made hydroponic fertilizers or mix organic alternatives at home.
- Maintain pH between 5.5–6.5 for maximum nutrient absorption.
Regularly check nutrient levels and water to ensure healthy, fast-growing cabbage.
Step 4: Preparing the Growing Medium

The growing medium supports the plant while allowing roots to access nutrients efficiently.

- Coconut coir retains moisture and provides aeration.
- Perlite or vermiculite ensures good drainage and root oxygenation.
- Fill the bottle top with medium and create a small hole for the seedling.
The medium helps the plant remain stable while absorbing nutrients from the solution.
Step 5: Sowing Seeds or Transplanting Seedlings
Depending on your preference, start with seeds or seedlings:
For Seeds:
- Sow 1–2 seeds in the growing medium.
- Keep the medium moist using a spray bottle.
- Germination occurs in 7–10 days under proper conditions.
For Seedlings:
- Carefully remove the seedling from its nursery container.
- Insert roots gently into the growing medium.
- Ensure roots are in contact with the nutrient solution.
Starting with seedlings often reduces time to harvest.
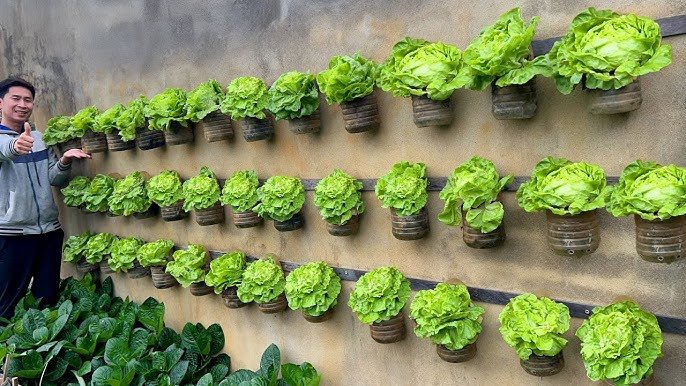
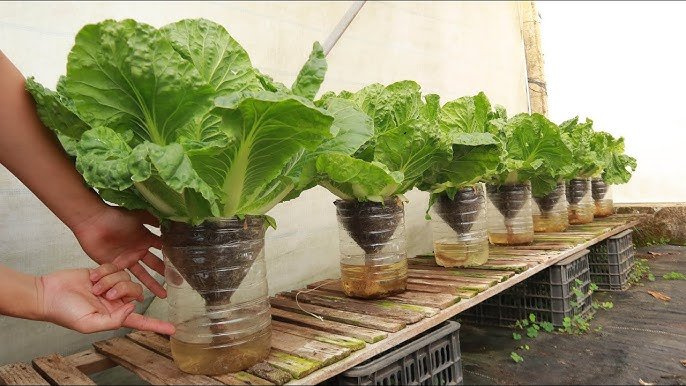
Step 6: Setting Up the Hydroponic System
There are several simple ways to arrange your bottles for efficient hydroponic growth:

- Vertical Setup: Hang bottles on a wall or frame using strings or hooks.
- Stacked Design: Stack bottles in tiers to save space.
- Horizontal Design: Line bottles on a flat surface with proper spacing.
Vertical setups are ideal for balconies and terraces, saving space while providing maximum light exposure.
Step 7: Light and Temperature Requirements
Cabbage requires adequate light and moderate temperature for healthy growth:
- Provide 6–8 hours of sunlight daily or use grow lights for indoor setups.
- Maintain temperature between 18–25°C for optimal growth.
- Avoid extreme heat or frost, as it may stunt growth or damage leaves.
Proper environmental conditions are essential for high-yield cabbage.
Step 8: Watering and Nutrient Management
Hydroponic systems require consistent nutrient availability:
- Keep the nutrient solution level constant; roots should always access the solution.
- Replenish or change solution every 10–14 days to prevent nutrient imbalance.
- Monitor pH and conductivity to ensure plants absorb nutrients effectively.
Regular management ensures fast, healthy growth and large, tender heads of cabbage.
Step 9: Pest and Disease Management
Hydroponic cabbage is less prone to soil-borne diseases, but some pests can still appear:

| Problem | Solution |
|---|---|
| Aphids | Spray neem oil or mild soap solution |
| Whiteflies | Use yellow sticky traps or organic sprays |
| Leaf miners | Remove affected leaves and monitor plants regularly |
| Fungal issues | Maintain airflow and avoid water stagnation |
Preventive care keeps cabbage healthy and high-yielding.
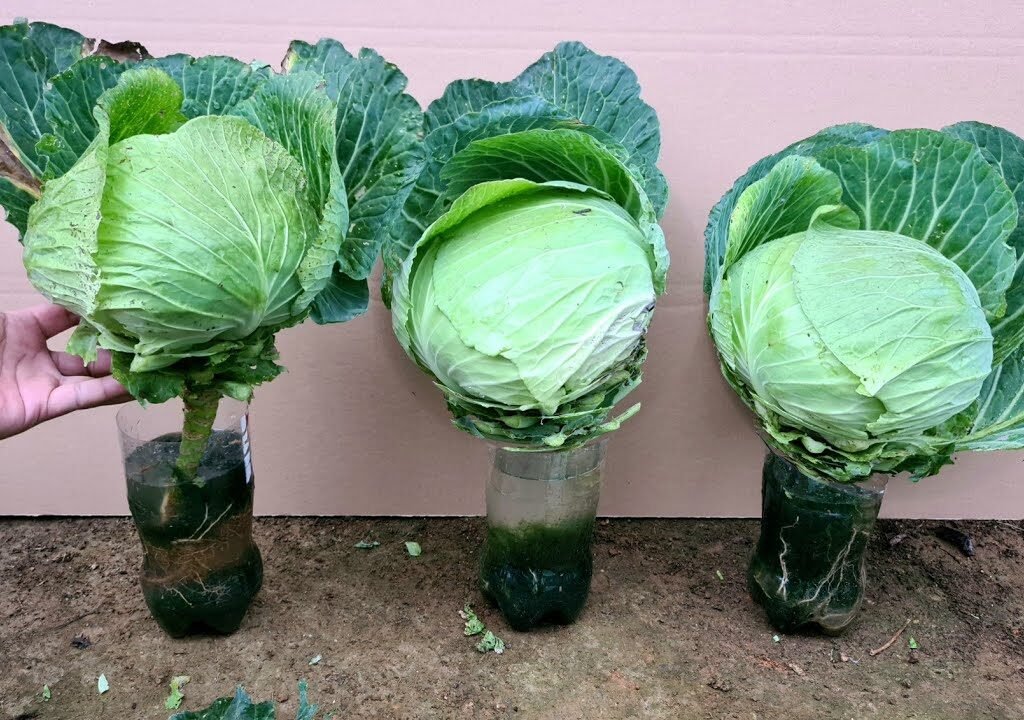
Step 10: Harvesting Hydroponic Cabbage
The first harvest depends on the variety and growth conditions:
- Leafy cabbage varieties: Harvest 30–40 days after germination.
- Head-forming cabbage: Harvest 60–80 days after transplanting when heads are firm and dense.
- Cut the outer leaves as needed to encourage continuous growth.
Hydroponic cabbage is fresh, clean, and highly nutritious, ready for cooking or salads.
Step 11: Tips for Maximum Yield
- Succession Planting: Grow new seedlings every 2–3 weeks for a continuous supply.
- Regular Pruning: Remove yellow or damaged leaves to focus energy on new growth.
- Clean System: Prevent algae buildup in bottles to maintain root health.
- Nutrient Balance: Adjust solution to suit cabbage growth stages (more nitrogen for leaves, balanced nutrients for heads).
Following these tips ensures more cabbage heads and better quality.
Step 12: Benefits of Using Recycled Plastic Bottles
- Eco-Friendly: Reduces plastic waste by reusing bottles.
- Cost-Effective: Saves money on commercial planters.
- Portable: Bottles can be moved easily for sunlight or maintenance.
- Scalable: Easily expand your hydroponic garden using more bottles.
This method combines sustainability and productivity, making home gardening practical and environmentally responsible.
Conclusion: Grow Hydroponic Cabbage Easily at Home
Hydroponic cabbage cultivation using recycled plastic bottles is simple, sustainable, and productive. With proper seeds, nutrient solution, light, and care, anyone can enjoy fresh, clean, and nutrient-rich cabbage at home.

Whether you live on a terrace, balcony, or have limited garden space, this method is perfect for urban gardeners. Start today and experience the joy of growing your own cabbage hydroponically, saving money, space, and effort while enjoying a healthy harvest!
Leave A Comment